 Creating schedule from your Revit model basically is just the same. You can count any data from your model. It can be door/window schedule, where you can show how many doors/windows. Or it can be wall schedule, to show wall length, wall area, or wall volume. You can also showing rooms area in your design. Almost everything! In this tutorial, we will create a door schedule. You can try to create different type of schedule later. They're all just the same steps!
If you haven't open your Revit model, open it now.
Schedule basically is also a view. So you can find the schedule tool in View tab, create panel.

Click on schedules, you will see several tools related to creating schedules. Let's just select schedule/quantities.
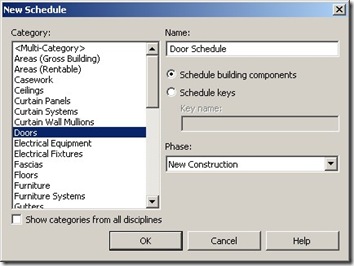
A new schedule dialog box will open. There are many categories you can select in this dialog. Because we are going to create a door schedule, select door from category. Click OK.

On the next dialog, Revit will ask you which fields you want to include in your schedule. Add these fields:
1- Level
2- Family type
3- Count
4- Cost
You may add several more if you wanted to. You can add them by selecting them then click Add -->. You can arrange their order by clicking move up/move down.

You should already see your schedule. Before we continue tweaking this schedule, input the door cost. You can change it directly on the schedule table cells. Revit will ask you a confirmation, whether you want to change all cost for the same family and type. Click OK.

Now you will see your schedule like this.

Every door instance is reported here. Our schedule hasn't group and sum the same item yet. We will fix this. Right click on your table, select view properties.
Revit will open a dialog box. Find sorting/grouping under Other category, and click edit… button right next to it.

- Let's sort our schedule. Select sort by Level for the first category. Check blank line option for this category.
- And then for 2nd category, select then by family and type.
- Uncheck Itemize every instance to deactivate it. Don't click OK. We haven't finished yet!

Now let's move to formatting tab. Select count field. Then check calculate totals to activate it. Why not, we want to see total number of our doors! Do the same for cost. Our schedule should show the total cost, isn't it?

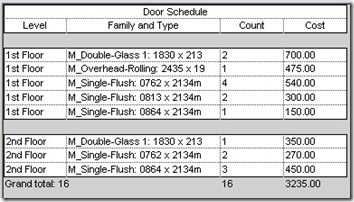
Click OK. You should see your schedule now grouped nicely like this.

Source: cad-notes.com

0 nhận xét:
Đăng nhận xét